📗 kubectl
워커 노드에 명령을 내리는 명령어
kubctl 실행전 root 권한으로 전환 후 실행시킨다.
사용방법
kubctl [command] [TYPE] [NAME] [flages]
[command]
create, get, delete, edit 등 자원에 실행할 명령
[TYPE]
node, pod, service 자원의 타입
[NAME]
자원의 이름 어플리케이션 이름
[flags]
명령어 옵션
📗 kubectl 명령어
⭐ 노드에 대한 상세정보
kubectl decribe node master⭐ 파드 생성하기
webserver라는 name으로 nginx 1.14버전 80 서비스 생성
kubectl run webserver --image=nginx:1.14 --port 80⭐ 노드 조회하기
kubctl get nodes

root@ubuntu:~# kubectl get nodes
NAME     STATUS   ROLES                  AGE   VERSION
node1    Ready    <none>                 45h   v1.23.5
node2    Ready    <none>                 45h   v1.23.5
ubuntu   Ready    control-plane,master   45h   v1.23.5
⭐ 파드 조회하기
root@ubuntu:~# kubectl get pods
NAME        READY   STATUS    RESTARTS   AGE
webserver   1/1     Running   0          56s
root@ubuntu:~#
root@ubuntu:~#
root@ubuntu:~# kubectl get pods -o wide
NAME        READY   STATUS    RESTARTS   AGE    IP          NODE    NOMINATED NODE   READINESS GATES
webserver   1/1     Running   0          108s   10.44.0.1   node1   <none>           <none>
root@ubuntu:~# kubectl de
debug     delete    describe
root@ubuntu:~# kubectl describe pod webserver
Name:         webserver
Namespace:    default
Priority:     0
Node:         node1/192.168.171.137
Start Time:   Thu, 07 Apr 2022 10:33:54 -0700
Labels:       run=webserver
Annotations:  <none>
Status:       Running
IP:           10.44.0.1
IPs:
  IP:  10.44.0.1
Containers:
  webserver:
    Container ID:   docker://77e41b815dd5b5eb4503e975c22659eb101f76cc1aef7e652ddbc8334dce37ec
    Image:          nginx:1.14
    Image ID:       docker-pullable://nginx@sha256:f7988fb6c02e0ce69257d9bd9cf37ae20a60f1df7563c3a2a6abe24160306b8d
    Port:           80/TCP
    Host Port:      0/TCP
    State:          Running
      Started:      Thu, 07 Apr 2022 10:34:05 -0700
    Ready:          True
    Restart Count:  0
    Environment:    <none>
    Mounts:
      /var/run/secrets/kubernetes.io/serviceaccount from kube-api-access-26wp2 (ro)
Conditions:
  Type              Status
  Initialized       True
  Ready             True
  ContainersReady   True
  PodScheduled      True
Volumes:
  kube-api-access-26wp2:
    Type:                    Projected (a volume that contains injected data from multiple sources)
    TokenExpirationSeconds:  3607
    ConfigMapName:           kube-root-ca.crt
    ConfigMapOptional:       <nil>
    DownwardAPI:             true
QoS Class:                   BestEffort
Node-Selectors:              <none>
Tolerations:                 node.kubernetes.io/not-ready:NoExecute op=Exists for 300s
                             node.kubernetes.io/unreachable:NoExecute op=Exists for 300s
Events:
  Type    Reason     Age    From               Message
  ----    ------     ----   ----               -------
  Normal  Scheduled  2m15s  default-scheduler  Successfully assigned default/webserver to node1
  Normal  Pulling    2m14s  kubelet            Pulling image "nginx:1.14"
  Normal  Pulled     2m5s   kubelet            Successfully pulled image "nginx:1.14" in 9.121941907s
  Normal  Created    2m4s   kubelet            Created container webserver
  Normal  Started    2m4s   kubelet            Started container webserver
⭐ 파드 삭제하기
kubectl delete pod webserver⭐ deployment 생성하기
pod를 묶은 형태(?)로 다수의 파드를 묶어서 생성
mainui라는 이름의 deployment를 httpd 파드 3개 만들어
kubectl create deployment mainui --image=httpd --relicas=3

root@ubuntu:~# kubectl get deployments.apps
NAME     READY   UP-TO-DATE   AVAILABLE   AGE
mainui   3/3     3            3           17s
root@ubuntu:~# kubectl get deployments.apps -o wide
NAME     READY   UP-TO-DATE   AVAILABLE   AGE   CONTAINERS   IMAGES   SELECTOR
mainui   3/3     3            3           27s   httpd        httpd    app=mainui
root@ubuntu:~#
root@ubuntu:~# kubectl get pods
NAME                    READY   STATUS    RESTARTS   AGE
mainui-6c98567f-ms4pn   1/1     Running   0          61s
mainui-6c98567f-zfd4g   1/1     Running   0          61s
mainui-6c98567f-znnmp   1/1     Running   0          61s
webserver               1/1     Running   0          9m3s
root@ubuntu:~# kubectl get pods -o wide
NAME                    READY   STATUS    RESTARTS   AGE     IP          NODE    NOMINATED NODE   READINESS GATES
mainui-6c98567f-ms4pn   1/1     Running   0          69s     10.47.0.1   node2   <none>           <none>
mainui-6c98567f-zfd4g   1/1     Running   0          69s     10.44.0.2   node1   <none>           <none>
mainui-6c98567f-znnmp   1/1     Running   0          69s     10.47.0.2   node2   <none>           <none>
webserver               1/1     Running   0          9m11s   10.44.0.1   node1   <none>           <none>
⭐ deployment 삭제하기
kubectl delete deployments.apps mainui⭐ 컨테이너 내부로 들어가기
컨테이너 내부에 들어가 설정등을 바 꿀수가 있다.
root@ubuntu:~# kubectl exec webserver -it -- /bin/bash
root@webserver:/# ls
bin  boot  dev  etc  home  lib  lib64  media  mnt  opt  proc  root  run  sbin  srv  sys  tmp  usr  var
⭐ 컨테이너 서비스 로그 확인하기
root@ubuntu:~# kubectl logs webserver
10.32.0.1 - - [07/Apr/2022:17:37:05 +0000] "GET / HTTP/1.1" 200 612 "-" "curl/7.68.0" "-"
10.32.0.1 - - [07/Apr/2022:17:52:49 +0000] "GET / HTTP/1.1" 200 616 "-" "curl/7.68.0" "-"
⭐ 디플로이먼트 수정하기
디플로이먼트 내 파드갯수를 5 > 6개로 수정한다. 명령어를 치면 vi가 열리고 저장하면 바로 적용이 된다.
kubectl edit deployments.apps mainui
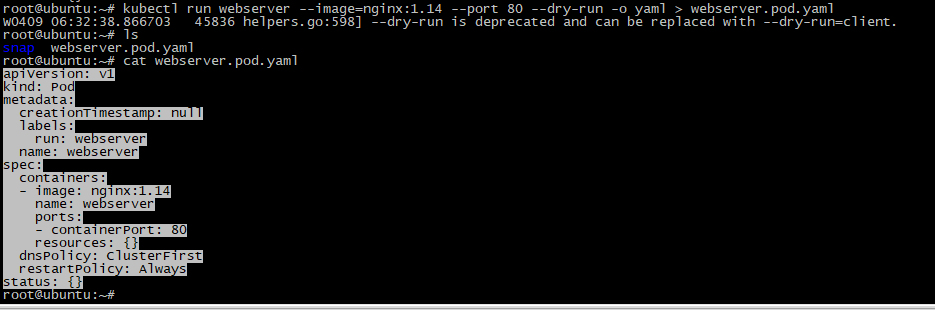
⭐ 파드 설정내역 yaml 파일로 추출하기
kubectl run webserver --image=nginx:1.14 --port 80 --dry-run -o yaml > webserver.pod.yaml명령어수행시 현재경로에 yaml 파일이 생성되고 설정내역 확인을 하면 다음과 같다.
⭐ yaml파일로 파드 생성하기
kubectl create -f webserver.pod.yaml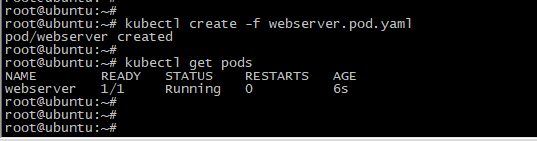
반응형
'인프라 > Docker&K8S' 카테고리의 다른 글
| 쿠버네티스 - yaml(야물) (0) | 2022.04.13 |
|---|---|
| 쿠버네티스 아키텍처 -네임스페이스(namespace) (0) | 2022.04.09 |
| vagrant 로 vm 생성하기 vagrant명령어 (0) | 2022.04.07 |
| 2022년 우분투 쿠버네티스(ubuntu Kubernetes) 설치 (0) | 2022.04.06 |
| teleport /lib64/libc.so.6: version `GLIBC_2.18' not found (0) | 2022.03.06 |


댓글